Tuesday, 24 November 2009

Phase (3)

As mentioned before we were divided into two main teams: control - mechanical


let's start with the control:


first we choose PIC18F452 as our microcontroller because it was:


  • Available
  • Easy to program
  • Low power
  • High performance
  • Large memory
  • Re programmable
  • And some technical specs 


we wanted to have two different control methods:


  1. was the normal controlling using the angles equations
  2. Test case: to try it on the presentation.....for that we added 4 sensors in order to adjust the solar panel in the required place.
we will talk on details about these two controlling methods later...


The idea 
was to get the best out of the tracking system....and the most accurate tracking was not the one done by equations, yet it was the most one used....why??
because if we tracked using the sensors we will have a major problem; what if the whether turned cloudy??!!


the scenario will be something like that:


it's cloudy, so the sensors reading will go crazy for a while or will read equally. after a while the sun will have moved from it's place to who knows where. when the clouds are off, the panel will be facing wrong direction, and either will be able to readjust itself if the the sunlight was still seen by any of the sensors. or the sunlight will already be gone leaving the panel in its place till next day....and that's a major waste of possible energy which make it a major problem............however under normal whether conditions.....sensors are better trackers than angles......that's because it is a real time sun tracker, instead of pre-calculated angles which might be not accurate from a day to another.


our aim was two develop both tracking methods and then as a future adjustment to the traker; AKA if we had time :D, we would add a cloud sensor and use it's output as a condition to shift between the two tracking systems.
however we didn't implement this part for two main reasons:
  1. lack of time of course
  2. lack of the required sensor (we needed to have it deliver from another country) and that wasn't available because as I said........no time, plus not all the team was excited about the idea to be honest...most of them just wanted the whole thing to get done we 7'las :D
Well, after this quick outline, lots of brainstorming and online searching, they designed the circuit, picked the components required and two of the team went shopping :)
the remaining team member (as the control team consisted of 3 members) started to develop the code.


to be continued isA.....


Sunday, 25 October 2009


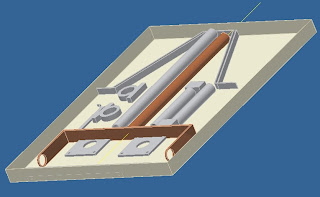
Our Final Design :D

This is the final design I mentioned in the last post

Advantages:

  • Simple
  • cheap
  • no calibration required
  • no gear backlashes
  • motors used have self locking mechanism


Phase (2)
Conceptual Designs....

picking up where we left at the end of phase (1), we started sketching our own designs. some where some how illogical and got rejected on the spot. others however were seriously taken into consideration; those were the one we picked up for the next level where we implemented 3Ds conceptual designs of them on Autodesk inventor

The first design was a gear-gear mechanism

main reason why we thought of something else was because of the gear backlashes which will lead to inaccuracy in the angles.

Second one was a gear-belt mechanism

we were trying to avoid the backlashes by using a toothed belt instead

third one was a belt-belt mechanism

it was less complicated and no gears used, but I don't' have an available pic for that one though

fourth one was a lame trial for something different

it was when we decided that these mechanisms were still too complicated, so we shifted our thinking completely and decided to make a swinging mechanism. we were already trying to avoid this cause we will then have to calibrate the angles and we didn't wanna do that :D , still trying to simplify the programming phase. yet, we gave it a shot.

fifth one was the swinging mechanism

in that one we enhanced the mechanism before it, more logical dimensions also :)

Sixth one

that was our final design that we actually implemented.... it was redesigned several times in the actual implementing but I will be posting it's picture and some details on the next post isA


Friday, 23 October 2009

Phase (1)

Researching......

we needed first to know what a solar tracker was? the start was a bit vague and unorganized but I will try to put it in points. It's a bit old now and I don't have all resources of the project, so you will find some stuff written with details and others are barely titles.


  • searching for general articles on solar energy
for that we surfed the net from basic definition on Wikipedia to detailed articles, why solar energy, usages, pros and cons, where is it used? , in what?.....etc


  • understanding how solar cell (panels) work
http://science.howstuffworks.com/solar-cell.htm


  • why tracking?
increase efficiency is the keyword here. once you figure out how important it is to shift for renewable energy sources, it's pretty obvious that you need to make the best out of them. Solar energy is one of the most important renewable energy source and it's not yet used as widely as it should be. Among the reasons for that is : high initial cost, not yet cost effective unless used on wide range, require space......etc. That's why it's important for the upcoming generation of engineers to not only continue with this field, but to actually enhance and implement new cheap, effective and compatible methods of using this great source.


  • what tracking methods are available?
well , starting with the drive either (Active, passive or chronological). Active is where you use gears or mechanical elements. Passive is when you use hydraulics (air, oil, materials that expand by heat....etc). Chronological depends on the theory of rotation of both sun and earth and the relative motion between them.
these definitions might not be scientifically accurate, but you will find details on the link below.

you can either track using one axis or two (that's when you study how the tilt angles of the sun rays on earth you will find out that they vary through out the year and through out the day, these changes are defined by the two angles Azimuth and Altitude). you choose by studying efficiency VS cost and choosing the best of the combination

for more details:


  • which method is the most convenient?
we chose Active tracking using 2 axis


  • The sun path (angles variation through out the year)
as simple as this could be; this is where the whole team went crazy!!!! Everyone understanding the angles differently resulted in too many conflicts at this part.
My Advice to you: Research this part WELL. We finally came out to a conclusion though, so no worries (H)

there were lots of sites that simply provided the angles scheduled on the net, but we wanted to have the equations used to calculate them in order to make life easy when we come to the programming phase. for this we did a couple of things:
  • we read a paper provided by the doctor regarding this matter and the detailed theortical background on how the whole tracking thing go and the sun path and stuff
  • we made a visit to the Egyptian Meteorological Authority; where they provided us with a book that we can use (they have a library their and a printer)
  • we checked with different sites
  • we used the equation actually to make the table of angles in order to check them with the real angles and make sure the equations are acurate
  • we revised the whole thing with the supervising doctor

  • searching for already made mechanisms
This is when google images comes handy :D , we searched for all kind of mechanisms at this stage. homemade, commercially used, graduation projects done before, you tube videos, brochures for companies that sold trackers. Anything we could find we collected
  • evaluating them
Of course commercially used trackers are well designed, so why evaluate ?? for more than one reason actually. First commercially sold ones already had more than a design plus, we didn't want to copy and paste one , we wanted to add something. we wanted our design to be SIMPLE. For this we evaluated all designs with the doctor's help (Who was NOT a mechanical engineer) His opinion was well respected and he had the eye of a buyer when it comes to mechanisms which was good to some extend and his comments were useful, but I will have to admit that it was a mistake depending on his opinion as this was not his area of expertise. It made the whole mechanical phase extend more than it should. We should have made with him the brainstorming sessions and the conclusion one, but we should have used a mechanical doctor/engineer opinions a bit earlier than this in the project. Anyways, the outcomes for the mechanical was great in my opinion so nothing to regret really :D , plus, if it weren't for him we would have settled up earlier on a traditional design, but that path let to good results AlHamdulliAllah :)


Enough for now.....
Continue later isA :)
hope it could be of help


Sunday, 4 October 2009

Where to start?

First we needed to divide the project into phases

phase one was researching and understanding

This phase included collecting data necessary to start. like previous designs. Angle ranges. how the mechanism should behave and how fast should it respond.

After this phase came these decisions:

tracking using 2 axis
active tracking (mechanical)

phase two was conceptual designs for the project

This phase included all team members. we brain stormed for different designs then we narrowed the choices to about 4 or 5 designs which we turned into 3D using Autodesk Inventor. we then chose our final design and went to phase 3

phase 3 the Team was divided into 2 main teams:

Team (1) was responsible for the mechanical design (The actual doing of the mechanism, finishing the calculations , choosing the material used, the coating, fixing the encoders) in addition to packing.

Team (2) was responsible for the control. They settled on the circuit design and then internally divided themselves into two teams:
one responsible for the microcontroller programing
and the other responsible for implementing the circuit.

phase 4 this is when the team came back together for the implementation phase.

during the previous phases we worked on the documentation

we finished the packing, brochure, documentation finalizing and printing on the last moment of course

This is a quick outline for the project. Details on the upcoming posts isA

Monday, 28 September 2009

Introduction

Let's start!

What's a solar Tracker?

A solar tracker is a device for orienting a day lighting reflector, solar photovoltaic panel or concentrating solar reflector or lens toward the sun. The sun's position in the sky varies both with the seasons (elevation) and time of day as the sun moves across the sky. Solar powered equipment works best when pointed at or near the sun, so a solar tracker can increase the effectiveness of such equipment over any fixed position, at the cost of additional system complexity. There are many types of solar trackers, of varying costs, sophistication, and performance.

Nowadays the development of the solar radiation conversion systems is focused mainly on aspects related to materials development and solar energy conversion processes. In the design process of the solar trackers the input data is the direct solar radiation that may be converted in Thermal energy (by using solar collectors) or electrical energy (by use of the photovoltaic panels)

The competitiveness of the solar energy conversion system on the market deals with their efficiency and an alternative solution for improving their efficiency is the use of the tracking systems.

According to the scientific literature, by increasing the incident radiation rate with solar trackers, in order to maximize the degree of direct (and diffuse) solar radiation collection, the efficiency of the solar radiation conversion systems may be increased up to 50%
_______________________________________________
Our Project
_____________

General Data
____________

Power 75 watt
Modular Surface Area 120*52.7 cm^2
Tracking axis 2

Saturday, 18 July 2009

hello world!

السلام عليكم و رحمة الله وبركاته

Since i'm in FCIS...fa kan lazem awel post yekoon
"hello world!" :D :D

mesh 3arfa meneen ne5aly el authors moshtarakeen w'meneen ne3mel upload le file
as soon as i know ha7otoko koloko isA :)
if i didn't know hal3'eeh w'ne3mel wa7ed gedeeeed :D